
My creative Christmas….thanks to Hobbycraft
Posted: December 12, 2012 Filed under: Absolutely Nothing To Make Leave a commentWhen it comes to arts and crafts and handmade, homemade things, I don’t claim to be terribly good or hugely inventive. In the past Ive tried to follow in the steps of Kirsty and Martha and attempt all kinds of wonderful (expensive) creations which generally don’t work out the way I’d hoped and are not suited to someone with very little patience. I like things to be done quickly and with little effort but I also enjoy the satisfaction of having made or created something myself. Those things don’t often go hand in hand. This Christmas, however, I have surprised even myself with some of my handy work but for the most part, it is all thanks to the fabulous emporium which is Hobbycraft.
If the idea of sewing and gluing and stapling and baking and primping and ribboning (if that’s a word) leaves you cold, then look away now. But if you have even the smallest desire to create some Christmas decorating cheer with your very own hands, then carry on reading.

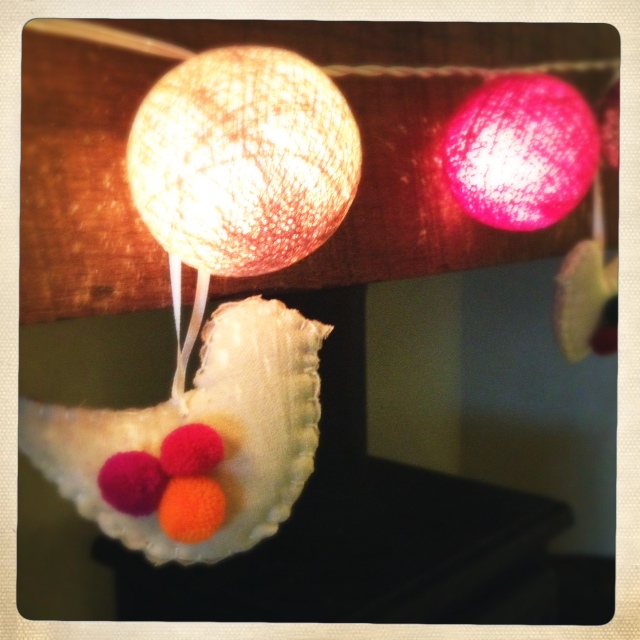
So firstly, my bird and star tree decorations. The basic plain bird / star cost just 99p each from Hobbycraft, the bag of pom poms cost me £1.99 on Etsy…but you can get them in Hobbycraft too I’m sure. I rather liked them plain but my 4 year old complained that they didnt have wings and so I set about with some pom poms and fabric glue (Hobbycraft) and there we go, wings (sort of). The stars were a basic 5 point pom pom affair. They’ve been hanging for over a week now and knocked around by cats and children and still the poms stay put. And they took about 10 minutes to do whilst drinking a glass of wine. You see, easy AND enjoyable.
The orange slices were done on a whim when I saw 3 lonely looking oranges in the fruit bowl who weren’t going anywhere. So I sliced them, lay them directly on the oven shelf and baked them for an hour or so on a medium setting. Or just until they looked dry and Christmassy. At the moment I have most of them in a jar waiting patiently for a good idea and I put a few around a candle with some pine cones collected from the park. It’s quite a sophisticated arrangement for me but it makes me feel grown up. I shall use the rest as part of a holly wreath for the door or perhaps add them to a garland of pine cones or I might just open the jar from time to time and smell them. They make me feel strangely proud. It’s Pomanders next, just as soon as I work out exactly what they are.


And then to the crackers. £3.99 for a pack of 6. All you have to do is roll them (the “bang” is prefixed to the card), put in the hat and joke provided, a present of your choice and ribbon them up. I put a chocolate coin in each which makes for a perfectly satisfactory rattle.

So far so good. I may attempt more as the days go on or I may just sit back and see how long it takes until the kids rip off the pom poms and raid the crackers. Christmas is for the children after all.
Sounds of the school run
Posted: December 6, 2012 Filed under: Absolutely Nothing To Listen To, Absolutely Nothing To Watch Leave a commentOver the past couple of years my now 4 year old has chosen the soundtrack to the school run. At 2 and a half he favoured Gorillaz, then he moved on to The Black Ghosts and for the past year or so we’ve had The Beastie Boys.
This week marks the last few days of nursery school life before he starts Primary in January. He’s fine, I’m all emotional and silly, so this post is for him. It’s been a pretty great few years musically. I love you Cash, you rock.
Gorillaz : Stylo
Gorillaz : On Melancholy Hill
The Black Ghosts : Any Way You Choose To Give It
The Black Ghosts : Some Way Through This
The Beastie Boys : Song For The Man
The Beastie Boys : Body Movin
Absolutely Nothing To Make – Peony Pom Poms by Samantha Taylor
Posted: December 2, 2012 Filed under: Absolutely Nothing To Make Leave a commentI first published this wonderful post by Sam Taylor last year and Peony Pom Poms have become a permanent installation in our home ever since. I’ve been asked lots recently about whether it’s best to make them from scratch or buy them ready cut. I’d say from scratch as it’s the much cheaper option and incredibly satisfying. It also means you can be a bit more creative with your choice of tissue colours. I’m thinking about trying stripey pom poms this year – will report back if they work.
So here it is, the foolproof guide to Peony Pom Poms. Beware, they’re very addictive……

I came late to the pom pom party. In fact had I not been drooling regularly over kids’ room tours on ohdeedoh and various style blogs, they may yet have passed me by. But slowly I noticed these ethereal tissue paper bundles floating in some very chic nurseries and once I’d ascertained exactly what they were, and how to get them, I was on a mission. It seems that i’ve missed a trick because they have, in fact, become something of a phenomenon in crafty circles since their ‘invention’ by Martha Stewart some time around 2006. Whether or not this is entirely true, Her Royal Homeliness does have a knack for taking a craft trend and giving it a contemporary spin and if the images on the MS website don’t tempt you then you will probably never be a convert (you can buy them via the MSL Amazon store here)
They’re surprisingly easy to make too. You can follow her little tutorial here:
You need a pack of tissue paper (12 sheets should give you nice full poms), some florist’s wire and monofilament or ribbon to hang.
1. Stack your tissue. Fold the tissue, accordion style, in 1 1/2″ wide folds, creasing the folds.
2. Fold a length of florist’s wire in half. Slip over middle of folded tissue, twist. Trim the ends of the tissue (rounded or pointed depending on preference).
3. Turn on side and pull a layer at a time up and out, pulling away from centre.
4. Tie monofilament to wire for hanging


Of course, I realise any DIY bride, party and wedding planner worth their salt can whip up a roomful of these frothy little beauties blindfolded, but I wanted a more permanent reason to use them. So, as I’m a sucker for anything that will give the decor in my blah rented apartment in Hong Kong a bit of oomph without a) spending too much and b) infuriating the landlord, I determined that I needed to work them in to my own home. Hubby quickly vetoed any area he uses regularly (‘but surely they would look more masculine in monochrome shades?!’) So that left the kids’ rooms and the perfect opportunity to indulge my pom pom fixation, because they are both still at the age where MUMMY DEAREST KNOWS BEST mwah ha ha. So the baby (boy) got the pom poms and all my husband could say to the contrary was “you DO know he’s a boy, right?”. Pah.
Here they are in situ:

I realise my primping leaves a lot to be desired but this would be a pretty dull corner of the room without the poms don’t you think? Not too girly?
More pom pom loveliness (not mine by the way):


There are plenty of online stores devoted to poms (try Etsy) and many have a wide selection of sizes and colours and you generally choose between rounded or pointed petal ends. The more layers of tissue, the fuller your finished poms. They come folded and ‘unbloomed’ with wire, or ribbon, for hanging. It will probably take you a tad longer than you expect to get the knack (my tip: don’t pull too gently, be confident – fast and random is better) but I can assure you; a fully bloomed and primped pom pom is a very, VERY satisfying thing to behold. Just beware of primp fever. Once you start, it’s really very difficult to stop.
I purchased my Pom Poms from I Have Ribbon (U.S) Visit their Etsy store here (they ship internationally).
Check out this great little ‘pom blooming’ tutorial on You Tube from Paperwhite Pom-Poms.
So that was Movember….
Posted: December 2, 2012 Filed under: Absolutely Nothing To Grow, Absolutely Nothing To Watch, Absolutely Nothing To Wear Leave a commentI’ve never taken such a long break from ANTW but there has been a very good reason. This year Lucky Seven Caps – our hat company – partnered the incredible charity which is Movember.
We have spent the last 6 weeks or so in the midst of a wonderful, inspiring, pioneering and unbelievably fun group of people who it has been a pleasure to know. The work they do is nothing short of amazing and we are very proud to have been able to do our little bit to raise awareness and crown some Mo Bros.
And while Jay Jay was growing a Mo and running a very busy hat making studio, I made a little film which tells the story in 1 minute of when Lucky Seven met Movember.
Can’t wait for next year. I just need about 12 months or so to recover.
Sunday Scones
Posted: October 8, 2012 Filed under: Absolutely Nothing To Wear Leave a commentAnother food post. I’m sorry. Between work and children, I haven’t really done anything massively interesting in the past week or so but this weekend I called on my domestic side and I baked. It was really just an excuse to avoid the ironing if I’m honest and something to impress the children with. It did both.
I decided to make scones. Delicious crumbly, raisin filled scones. I’ve always wanted to make them but never dared. I had put the idea in the same “too difficult for me to attempt” box that contains shortbread and hot cross buns, but they’re not difficult at all and made for a very smug Sunday afternoon indeed.
I used the recipe from Jamie’s Great Britain and I didn’t really change a thing aside from the orange soaked raisins – I used some apple juice and left it for only 30 minutes or so – a decision made due to impatient children who don’t like orange juice, rather than anything else.

I’m a bit of a purest and like my scones warm with a bit of butter. Having said that, if was a real domestic goddess and had cream and jam to hand, I would have obviously done the whole cream tea thing.

This may seem a bit lazy, but I can’t find the recipe anywhere online so I’ve photographed it instead directly from the book. I think it works. Apologies if not, I’m sure you can just guess the blurred bits.


Bye Bye Facebook
Posted: September 19, 2012 Filed under: Absolutely Nothing To Wear 4 CommentsI have always had a love / hate relationship with social media. I’ve always had a slightly forced relationship with anything terribly social for that matter. On one hand I relish privacy and a quiet life and in the same breath I am deeply curious about people, trends, communication and the world around me. Which is why, I suppose, I write a blog (social) yet live in the countryside (not very social).
I wasn’t one of the first to join Facebook but I did fall for the powers of Twitter in the very early days. I tired of Pinterest much more quickly than I thought I would but I absolutely adore Instagram and think it is winning as my front runner in the social media race. Obviously I like blogging but that comes from a love of writing and a love of magazines and the printed word. I’m not sure it’s down to a love of being social….although I admit that I do certainly consider who might read my posts before, whilst and after I’ve posted them, but I do try desperately not to let it stop me. It comes more from a desire to share what I think might be interesting or useful or perhaps strike a cord with any like minded people. It allows me to be my own editor of my own magazine.
Anyway, for the past few months I’ve started to really dis-like Facebook. It was beginning to take up too much time – mainly because I manage 5 different company “Pages” – and whilst I was posting work related things, I couldn’t help but get sucked in to the News Feed. Some of the “status updates” and photos and news posts were interesting but they always became tangled amongst the “friends of friends” who I really didn’t need or want to know about. Also, Facebook trips people up all the time. Little white lies or innocent misunderstandings get completely out of control and it just stops being fun. No one can really be themselves. Plus, if I was to see one more status asking to copy and paste Facebook’s new privacy settings, I think I might have screamed. Whilst being hugely important, it also just kept reminding me over and over again that nothing on the internet is private. Nothing. So if you want to be private, posting your life on Facebook isn’t the way to do it, however many boxes you tick.
So I did it. I cancelled my Facebook account. Mel Burridge married to Jay Jay Burridge is no longer. Instead I have an alter ego who shall manage my company pages (I agree completely to the importance of Facebook for businesses) but she shall have no friends, photos or walls on which to post. It feels very good indeed. Lets just see how many friends remember my birthday.
Cauliflower Pakoras – Ottolenghi
Posted: September 13, 2012 Filed under: Absolutely Nothing To Cook, Absolutely Nothing To Eat 1 CommentAfter a recommendation from an ANTW reader, I made these last night and they were wonderful. Should have perhaps made half the amount of mixture but it means we can enjoy them for a second night. Plus they have no dairy which is good for all kinds of people and the vegetables stay really crunchy and delicious. I didn’t use nearly as much oil as it says in the recipe, it doesn’t need it, and I used Rape Seed Oil rather than Sunflower. Great with plain yoghurt and mango chutney.

Cauliflower pakoras
Although fried, these snacky treats are light in texture. Makes about 25.
150g chickpea flour
100g plain flour
1½ tsp baking powder
1 tsp cayenne pepper
½ tsp ground turmeric
2 tsp ground cumin
100g green beans, cut into 1cm pieces
1 medium cauliflower head, roughly chopped (400g net weight)
2 green chillies, finely chopped
2 cloves garlic, peeled and crushed
30g ginger, peeled and chopped fine
30g coriander leaves and stems, chopped
30g spring onion, trimmed and sliced thin
1 tsp coriander seeds, toasted and lightly crushed
10 fresh curry leaves (or 20 dried ones), finely chopped
300-400ml sunflower oil, for frying
200g Greek yoghurt
Salt
In a large bowl, mix the first six ingredients. Make a well in the centre and slowly pour in 350ml cold water, stirring just to combine; the batter can be a bit lumpy. Add all the other ingredients bar the oil and yoghurt, plus a teaspoon and a half of salt. Stir gently to combine and set aside.
Pour oil into a large frying pan to come 1.5cm up the sides and put on medium-high heat. Once hot, scoop in a large spoonful of batter and fry for 90 seconds to two minutes on each side, until golden brown. Remove with a slotted spoon, drain on kitchen paper and keep warm while you cook the rest in batches. Serve warm with yoghurt.
That thing called Fashion…
Posted: September 12, 2012 Filed under: Absolutely Nothing To Wear, Absolutely Nothing To Worry About 2 CommentsI’m going to say this very quietly and I may be wrong but I think I might be missing that thing called Fashion, just a little bit. It generally happens around this time of year, show time. I didn’t even really enjoy the shows that much, well not at the time anyway. When I was a young magazine fashion assistant I despised being made to stand right at the back where I couldn’t see anything but the odd pony tail swishing down the catwalk. Even worse than that I absolutely dreaded being made to sit in the front rows – to fill a space for a missing editor I might add – as I felt like a complete fraud and was always always wearing the wrong shoes / outfit / sock and shoe combo / hair style / coat….you name it, I got it wrong.
Then, when I crossed to the other side and was faced with the dreaded seating plan, I would spend days and nights and weeks pouring over the same row layout, wishing for more seats and feeling sick at the prospect of being screamed at. And always by a journalist in row 5 or 6. And generally from the Daily Mail. Not mentioning any names obviously.
So why would anyone in their right mind miss it? Well quite frankly, I’d like to put on a dress and some heels (even if they were the wrong ones) and I’d like to go to a show (I’ll decide which one in a minute) and not give a shit who was sitting next to me, in front of me or behind me. I’d like to take the goodie bag home because it really is supposed to be for me and I’d like to eat whatever might be on offer because I now know it’s absolutely fine to actually eat. And, I’d like to write notes in my notebook of all the things I think are lovely and not have to do anything about it but go home safe in the knowledge that fashion is still alive and well. And most of all, I’d just like to be reminded that there is definitely more to life that Breton stripes and Toast.
That’s better. I think I’m over it now. What? There are fashion shows happening right now in NY? Really? I hadn’t noticed.
Be true to those who trust thee
Posted: September 11, 2012 Filed under: Absolutely Nothing To Listen To, Absolutely Nothing To Read, Absolutely Nothing To Smile About Leave a commentMy Mum sent me this reading and I love it.
It was read as part of a Christening and rings true for so many reasons.
“Be true to those who trust thee”, Anon
Be true to those who trust thee,
Be pure for those who care.
Be strong, for there is much to suffer,
Be brave for there is much to dare.
Be a friend to all – the foe, the friendless.
Be giving and forget the gift.
Be humble, for thou knowest thy weakness.
And then, look up and laugh and love and live.
Not just another Ottolenghi blog…
Posted: September 9, 2012 Filed under: Absolutely Nothing To Buy, Absolutely Nothing To Cook, Absolutely Nothing To Eat, Absolutely Nothing To Read, Absolutely Nothing To Smile About 2 CommentsEver since the wonderful Wilderness Festival, we’ve become a little bit addicted to the various culinary delights from Ottolenghi and Moro. I always like to think of myself as being a little bit behind the trends, someone once told me I would never be a visionary and so I’ve taken this on board and now store any ideas and discoveries and release them to the world when they think it’s all over…..well that’s what I like to tell myself anyway. So, with that in mind, I am very aware that these two restaurants / cookbooks / deliciousness won’t necessarily be new to many, but if like me you haven’t yet attempted them at home, may I suggest that you do….immediately.

Favourite books of the moment
We started with The Moro Cookbook and both Ottolenghi’s, Plenty and The Cookbook and most recently we’ve moved on to the wonderful new Jerusalem from Yotam Ottolenghi and Sami Tamimi. We’ve re-stocked our spice cupboard with things such as Zatar and Sumac and made sure there’s enough Cumin, Turmeric, Corriander and Cardamon to see us through every recipe we may attempt. To begin the feast I chose something relatively easy : Chilled Red Pepper Soup and Cauliflower Fritters, both from Ottolenghi followed by Aubergine and Tomato Pilav from Moro. Not all in one sitting, that would be ridiculous….although very very tempting.

Cauliflower and Cumin Fritters – Ottolenghi

Roasted Red Pepper Soup – Ottolenghi
And then last night came the best of the best, both from Jerusalem : Pureed Beetroot with Yoghurt and Za’atar and Butternut Squash and Red Onion roasted with Tahini and Za’atar. It was ridiculously good and so easy and really annoying that we had no one over for dinner to show off to share with.

Pureed Beetroot with Yoghurt and Za’atar – Ottolenghi Jerusalem
Pureed Beetroot with Yoghurt and Za’atar – Ottolenghi, Jerusalem
6 medium beets trimmed
2 small garlic cloves, crushed
1 small red chilli, seeded and minced
250g plain Greek yogurt
3 tablespoons extra-virgin olive oil
1 1/2 tablespoons Date syrup (or pure maple syrup works too)
1 tablespoon Za’atar
Salt
Handful roasted, crushed hazelnuts
2 tablespoons goat cheese, crumbled
2 spring onions, thinly sliced
Preheat the oven to 350°. Wash and trim the beetroot and wrap each one individually in silver foil. Place in a baking tray and cook for about an hour – until you can pierce them with a sharp knife.
Once cool peel the beetroot, cut into wedges and transfer to a food processor. Add the garlic, chilli and yoghurt and pulse until blended. Add the olive oil, date or maple syrup and za’atar and puree. Season with salt. Scrape into a wide, shallow bowl. Scatter the hazelnuts, goat cheese and spring onion on top and serve.

Butternut Squash and Red Onion, roasted, with Tahini and Za’atar
Butternut Squash and Red Onion, roasted, with Tahini and Za’atar – Ottolenghi, Jerusalem
1 large butternut squash (around 1.1kg), cut into 2cm x 6cm wedges
2 red onions, cut into 3cm wedges
50ml olive oil
Maldon sea salt and black pepper
3½ tbsp tahini paste
1½ tbsp lemon juice
3 tbsp water
1 small garlic clove, crushed
30g pine nuts
1 tbsp za’atar
1 tbsp roughly chopped parsley
Heat the oven to to 220C/425F/gas mark 7. Put the squash and onions in a large bowl, add three tablespoons of oil, a teaspoon of salt and some black pepper, and toss well. Spread, skin down, on a baking sheet and roast for 40 minutes until the vegetables have taken on some colour and are cooked through. Keep an eye on the onions: they may cook faster than the squash, so may need to be removed earlier. Remove from the oven and leave to cool.
Put the tahini in a small bowl with the lemon juice, water, garlic and a quarter-teaspoon of salt. Whisk to the consistency of honey, adding more water or tahini as necessary.
Pour the remaining oil into a small frying pan on a medium-low heat. Add the pine nuts and half a teaspoon of salt, cook for two minutes, stirring, until the nuts are golden brown, then tip the nuts and oil into a small bowl.
To serve, spread the vegetables on a platter and drizzle over the sauce. Scatter the pine nuts and oil on top, followed by the za’atar and parsley.

