
My creative Christmas….thanks to Hobbycraft
Posted: December 12, 2012 Filed under: Absolutely Nothing To Make Leave a commentWhen it comes to arts and crafts and handmade, homemade things, I don’t claim to be terribly good or hugely inventive. In the past Ive tried to follow in the steps of Kirsty and Martha and attempt all kinds of wonderful (expensive) creations which generally don’t work out the way I’d hoped and are not suited to someone with very little patience. I like things to be done quickly and with little effort but I also enjoy the satisfaction of having made or created something myself. Those things don’t often go hand in hand. This Christmas, however, I have surprised even myself with some of my handy work but for the most part, it is all thanks to the fabulous emporium which is Hobbycraft.
If the idea of sewing and gluing and stapling and baking and primping and ribboning (if that’s a word) leaves you cold, then look away now. But if you have even the smallest desire to create some Christmas decorating cheer with your very own hands, then carry on reading.

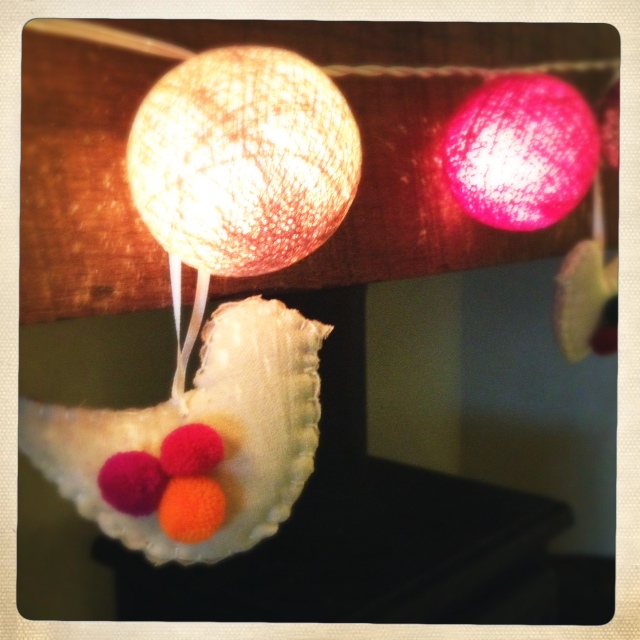
So firstly, my bird and star tree decorations. The basic plain bird / star cost just 99p each from Hobbycraft, the bag of pom poms cost me £1.99 on Etsy…but you can get them in Hobbycraft too I’m sure. I rather liked them plain but my 4 year old complained that they didnt have wings and so I set about with some pom poms and fabric glue (Hobbycraft) and there we go, wings (sort of). The stars were a basic 5 point pom pom affair. They’ve been hanging for over a week now and knocked around by cats and children and still the poms stay put. And they took about 10 minutes to do whilst drinking a glass of wine. You see, easy AND enjoyable.
The orange slices were done on a whim when I saw 3 lonely looking oranges in the fruit bowl who weren’t going anywhere. So I sliced them, lay them directly on the oven shelf and baked them for an hour or so on a medium setting. Or just until they looked dry and Christmassy. At the moment I have most of them in a jar waiting patiently for a good idea and I put a few around a candle with some pine cones collected from the park. It’s quite a sophisticated arrangement for me but it makes me feel grown up. I shall use the rest as part of a holly wreath for the door or perhaps add them to a garland of pine cones or I might just open the jar from time to time and smell them. They make me feel strangely proud. It’s Pomanders next, just as soon as I work out exactly what they are.


And then to the crackers. £3.99 for a pack of 6. All you have to do is roll them (the “bang” is prefixed to the card), put in the hat and joke provided, a present of your choice and ribbon them up. I put a chocolate coin in each which makes for a perfectly satisfactory rattle.

So far so good. I may attempt more as the days go on or I may just sit back and see how long it takes until the kids rip off the pom poms and raid the crackers. Christmas is for the children after all.
Absolutely Nothing To Make – Peony Pom Poms by Samantha Taylor
Posted: December 2, 2012 Filed under: Absolutely Nothing To Make Leave a commentI first published this wonderful post by Sam Taylor last year and Peony Pom Poms have become a permanent installation in our home ever since. I’ve been asked lots recently about whether it’s best to make them from scratch or buy them ready cut. I’d say from scratch as it’s the much cheaper option and incredibly satisfying. It also means you can be a bit more creative with your choice of tissue colours. I’m thinking about trying stripey pom poms this year – will report back if they work.
So here it is, the foolproof guide to Peony Pom Poms. Beware, they’re very addictive……

I came late to the pom pom party. In fact had I not been drooling regularly over kids’ room tours on ohdeedoh and various style blogs, they may yet have passed me by. But slowly I noticed these ethereal tissue paper bundles floating in some very chic nurseries and once I’d ascertained exactly what they were, and how to get them, I was on a mission. It seems that i’ve missed a trick because they have, in fact, become something of a phenomenon in crafty circles since their ‘invention’ by Martha Stewart some time around 2006. Whether or not this is entirely true, Her Royal Homeliness does have a knack for taking a craft trend and giving it a contemporary spin and if the images on the MS website don’t tempt you then you will probably never be a convert (you can buy them via the MSL Amazon store here)
They’re surprisingly easy to make too. You can follow her little tutorial here:
You need a pack of tissue paper (12 sheets should give you nice full poms), some florist’s wire and monofilament or ribbon to hang.
1. Stack your tissue. Fold the tissue, accordion style, in 1 1/2″ wide folds, creasing the folds.
2. Fold a length of florist’s wire in half. Slip over middle of folded tissue, twist. Trim the ends of the tissue (rounded or pointed depending on preference).
3. Turn on side and pull a layer at a time up and out, pulling away from centre.
4. Tie monofilament to wire for hanging


Of course, I realise any DIY bride, party and wedding planner worth their salt can whip up a roomful of these frothy little beauties blindfolded, but I wanted a more permanent reason to use them. So, as I’m a sucker for anything that will give the decor in my blah rented apartment in Hong Kong a bit of oomph without a) spending too much and b) infuriating the landlord, I determined that I needed to work them in to my own home. Hubby quickly vetoed any area he uses regularly (‘but surely they would look more masculine in monochrome shades?!’) So that left the kids’ rooms and the perfect opportunity to indulge my pom pom fixation, because they are both still at the age where MUMMY DEAREST KNOWS BEST mwah ha ha. So the baby (boy) got the pom poms and all my husband could say to the contrary was “you DO know he’s a boy, right?”. Pah.
Here they are in situ:
I realise my primping leaves a lot to be desired but this would be a pretty dull corner of the room without the poms don’t you think? Not too girly?
More pom pom loveliness (not mine by the way):


There are plenty of online stores devoted to poms (try Etsy) and many have a wide selection of sizes and colours and you generally choose between rounded or pointed petal ends. The more layers of tissue, the fuller your finished poms. They come folded and ‘unbloomed’ with wire, or ribbon, for hanging. It will probably take you a tad longer than you expect to get the knack (my tip: don’t pull too gently, be confident – fast and random is better) but I can assure you; a fully bloomed and primped pom pom is a very, VERY satisfying thing to behold. Just beware of primp fever. Once you start, it’s really very difficult to stop.
I purchased my Pom Poms from I Have Ribbon (U.S) Visit their Etsy store here (they ship internationally).
Check out this great little ‘pom blooming’ tutorial on You Tube from Paperwhite Pom-Poms.
Just peachy
Posted: August 2, 2012 Filed under: Absolutely Nothing To Cook, Absolutely Nothing To Eat, Absolutely Nothing To Make, Absolutely Nothing To Smile About, Absolutely Nothing To Write Home About 1 CommentI’ve been a little lazy with posts recently but if I don’t write this down now, I’m worried I might forget it.
We’re in the South of France at the moment, having a wonderful time with family and friends and eating delicious things. These holidays always very much revolve around food. Conversation at breakfast is generally about what’s on the menu for lunch and dinner and everyone is keen to offer their own contribution to the table. Last night was my turn and so baked peaches with Roquefort and Parma ham for 12 was on the menu. With my trusty sous chef looking over my shoulder by my side, we managed quite a spectacular plate of food and one I’ll definitely be making again….but perhaps in smaller quantities.
So here’s what we used and how we did it :
Peaches – we used a mixture of big round ones and the little flat ones all stoned and quartered. Allow about 4 pieces per person.
Roquefort
Parma Ham
Mixed leaves
Honey roasted walnuts
Thyme roasted almonds – or you just as easily use plain
Thyme
Salt
Pepper
Sugar
Olive Oil
First we baked the peaches on a low heat for about 30 minutes. Just all huddled in a tray and sprinkled with sugar, salt, pepper, olive oil and some fresh thyme.

Once done, leave them to cool a little – the salad is best served at room temperature.
The nuts – we bought a bag of walnuts and thyme scented almond. The walnuts we drizzled with honey and put in the oven for 15 minutes or so until the became sweet and crunchy. Once cooled, smash them all up in to little pieces with a rolling pin – the almonds too. Set aside to use later.

We cut the parma ham in to small strips and crumbled the roquefort….more about this later
Dress the leaves with a little bit of olive oil and vinegar. It doesn’t need a strong dressing as all the flavours are to come.
Place a small pile of leaves on the plate. Set the peaches on top and lay the strips of parma ham across them. Not too much. Sprinkle the crumbled roquefort – again, you don’t need too much – and drizzle some of the juices from the peaches pan over the salad. Lastly throw some of the crushed nuts around the plate and that’s it!


Making medicine – my new addiction
Posted: May 11, 2012 Filed under: Absolutely Nothing To Make, Absolutely Nothing To Read, Absolutely Nothing To Worry About Leave a commentYesterday, when having morning coffee with a friend, I learned something about our current state of mind (worrying about everything) and apparent addiction to the Daily Mail website. Oh dear, what on earth has happened to us. I’m putting both down to age and too much time on our hands – by time, I mean the time spent running around after children, not the time spent lounging around reading magazines. That would be ridiculous. I definitely subscribe to the first problem, the worrying. I worry about everything, I worry about worrying. I worry when I have nothing to really worry about. My old age (I’m not really very old I just behave as if I am) has me worrying about my health and my family’s health all the time. It’ll probably be the worrying that gets me in the end.
Because I’m a worrier I actually live a pretty healthy and sensible (prudish) life and being a relative new-comer to countryside dwelling, have come to embrace nature and the natural. My latest discovery in the world of natural remedies and ways to enhance your life and health is this brilliant book, Kitchen Medicine – Household remedies for common ailments and domestic emergencies. I think it could be my new addiction. I’m currently drying rosemary and thyme sticks which I will burn and “waft” around the room to promote well being and clear air. I’m definitely making some rosemary wine (to aid circulation) and will be making fenugreek tea to take as tonic when the next cold and flu hits the house….which, judging by probability, should be some time next week. The book is full of easy remedies which can be created in minutes using all sorts of things we have lurking in the spices cupboard or growing in the garden. Or failing that, things we can easily pick up in the shops. Cinnamon is apparently particularly good for treating sinus infections, chesty coughs and head colds, all of which are regular visitors to this household. So next time, we won’t be drugging ourselves with Night Nurse but warming our insides with star anise tea and a shot of cinnamon vodka in a bedroom sweet with rosemary and thyme and sleeping like babies with not a worry in the world.

For those with the Daily Mail website addiction I’m afraid I can’t help. Cold turkey seems to be the only way. Repeat after me – I don’t need to see Tulisa in a bikini doing whatever it is she does or a Middleton in pastel jeans (I’m guessing) or the some poor overweight orange person. Look at Pinterest instead, you’ll find the same pictures without the gutter press guilt.
A Very Retro Modern Easter
Posted: April 12, 2012 Filed under: Absolutely Nothing To Do, Absolutely Nothing To Make, Absolutely Nothing To Smile About Leave a commentWell thank goodness that’s all over. My children are only just coming down from the sugar high and can apparently still see “rabbit foot prints” all over the house. It would seem their minds have been addled by chocolate. I was determined to have a happy but frugal Easter. One filled with daffodils, country walks and perhaps the odd mini egg, rather than lashings of lamb, masses of eggs and rainy afternoon movies. Obviously it was the latter that won out. Although I did manage to limit the chocolate and began the weekend with gifts of egg cups for boiled eggs and soldiers and a home made chocolate rabbit (my 2012 triumph). These were soon superceded by my husband’s thoroughly modern take on the traditional egg hunt – one where all clues were held on an iPhone – with what seemed like hundreds of mini eggs and went on for days.
First the home made chocolate rabbits. When I say home made, I just melted some chocolate and poured (scraped) it in to a lovely old tin mould we found at an LA flea market, squashed it together and shoved it in the freezer. I would have put money on it not working but it did! I used cheap chocolate which made the whole thing a little less delicate than it perhaps should have been and therefore the rabbits were a solid mass rather than hollow and airy but who cares, the kids certainly didn’t. But then neither did they care that I’d made them. I suppose it was one of those win win situations – I was allowed to feel like a really great Mum by creating something by hand and they just thought I was a really great Mum because I was willingly giving them chocolate.
And here they are, before and after. Hugely satisfying.

Rabbit Mould

Homemade chocolate rabbit
Then on to the Easter egg hunt via iPhone. It’s actually a rather brilliant way of ensuring younger children can find the treasure. Especially when there are older brothers who know exactly what they’re doing and have already formulated a plan to get as many eggs as they possibly can, by whatever means. It works like this, hide the eggs and take a photo of the hiding place. Then, simply show them the photograph, one at a time, and off they’ll charge to find the prize. The only downside is that all good things come to an end and if they’re anything like my children, they’ll still be looking through your phone a week later convinced that behind every single photograph hides an egg.

Egg Hunt
ANTW Advent Calendar, Day 7 : Make and Do
Posted: December 7, 2011 Filed under: Absolutely Nothing To Buy, Absolutely Nothing To Make, Absolutely Nothing To Open Leave a commentI love these books. They are a reprint of the classic Ladybird collection called Make and Do and include 3 books – Tricks and Magic, Easy To Make Puppets and Things To Make
The perfect present for any wannabe domestic goddess or those determined to do more crafts with their children. Not that I’m speaking from experience.

Vintage Ladybird Make and Do Box
I have one brand new boxed set to give away. All you need to do is answer this question in the form provided below :
Who founded Ladybird Books?


Winner announced Monday 12th December so that I can try and get it you in time for Christmas.
Absolutely Nothing To Make : Chocolate Brownies and a Pumpkin
Posted: October 30, 2011 Filed under: Absolutely Nothing To Cook, Absolutely Nothing To Make Leave a commentI hardly dare admit it but I’d never made chocolate brownies until this weekend so I decided that Halloween was as good as excuse as any to have a go. These are delicious. They contain more chocolate than can possibly be good for anyone but we’re not complaining. And we made them suitably scary with the addition of these ghoulish sticks of decorating joy.
Double Chocolate Brownies from The River Cottage Family Cookbook
by Hugh Fearnley-Whittingstall and Fizz Carr
250g good dark chocolate
200g unsalted butter
200g caster sugar
3 free-range eggs
125g plain flour
50g cocoa powder
100g broken walnuts
Pre-heat oven to 160C/gas mark 3. Put 3-4cm water into a saucepan and bring it to a simmer. Break chocolate up, cut up the butter, and place both in a mixing bowl. Put it over the pan of simmering water and turn the heat off. Stir until melted together and smooth.
In another bowl whisk the sugar with the eggs, using the balloon whisk, until the mixture is smooth and creamy. Add chocolate mixture to the eggs; mix thoroughly with wooden spoon.
Sift flour and cocoa powder and mix thoroughly. Stir in walnuts if you have decided to use them. Line the baking tin with a piece of foil and pour in the mixture. Oven gloves on. Place the tin on a shelf in the middle of the oven and bake for 20-25 minutes. Oven gloves back on. Take the tin out of the oven and stand on wire rack. Leave until cool enough to cut into squares.

Halloween Brownies
And to accompany my baking we of course had to have a pumpkin who, carved by my husband, looks like he might have overindulged with one too many brownies.

Poorly Pumpkin
Absolutely Nothing To Make or Buy : A Homemade Home…..unfinished
Posted: October 26, 2011 Filed under: Absolutely Nothing To Buy, Absolutely Nothing To Make, Absolutely Nothing To Wear Leave a commentYes, I’ll enjoy doing some needlework in front of the fire during the cold Winter months. I should have this done in time for Christmas if I do a little bit every night. That was 3 years ago and I’ve done a despairing one line of said Emily Peacock Kiss tapestry and it now sits in a bag on a shelf near the sofa laughing at me. But still I’m determined, and strangely convinced, that I will finish it. One day. Just as soon as I work out the instructions and manage to stay awake past 9pm.

KISS Tapestry by Emily Peacock
I like making things but for some reason I still haven’t learned that I’m not nearly as good as I hope I am and that these crafty things take far more patience than I will ever have. I blame Kirsty and Cath Kidston and all those women I hate to like. I don’t want to be one of them, I’m too busy doing other busy, modern woman about the countryside sort of things.
So, as I get ready for another episode of Kirsty’s Homemade Britain which I shall watch whilst lounging comfortably on the piles of envelope cushions which litter my sofa (they’re addictively easy to make once you get the hang of it) I’ve found something else I want to have a go at. These advent calendar kits from Cox and Cox not only look lovely in the pictures but I reckon they’ll look even lovelier when hanging on the wall and my children will think I’m the best Christmas Mum in the world. My husband says I’ll never finish them and he’s seen a chocolate Lego calendar which they’ll like much more. He’s probably right but I’m going to give it a go. I’ll just try the one – they can share, they’ll like that. Who’d want a chocolate advent calendar all made and ready to go, when they can have a half-finished, homemade one filled with whatever I can find lying around the house the night before. No contest surely.

Advent Calendar Kit from Cox and Cox
Absolutely Nothing To Grow : Terrariums
Posted: August 5, 2011 Filed under: Absolutely Nothing To Do, Absolutely Nothing To Grow, Absolutely Nothing To Make, Absolutely Nothing To Smile About 2 CommentsI do not have a garden. Very few people in Hong Kong do. Space is at a premium, property prices are eye-watering and it’s so darn hot for most of the year, you’re finding reasons to scuttle inside to the air conditioning rather than get busy with the pruning shears. This wasn’t always the case. When we first moved here, we had a very pleasant little garden and I even – ludicrously, given it’s petite proportions – employed a gardener. This wasn’t entirely because I am a lazy expat wife and useless with plants (I would kill mould if I could get it to grow), it was a necessity. You see one of the drawbacks to living in a virtually garden-free city, is that it is almost impossible to buy a lawnmower. If you have outside space, you either pave it, or employ a man-with-a-mower. We had lawn, and Jun was ‘the man’.
Fast forward a few years, and several moves later, not only has the garden gone, but so has a balcony. I have come to the conclusion that, out here, gardens are only good for snakes and mosquitoes (we had a particularly delightful nest of deadly pit vipers in aforementioned garden) and balconies are only for old (dead) Christmas trees, bicycles and the occasional crafty ciggy. They are not for sitting on and they are NOT, in my hands anyway, a vertiginously placed oasis of green in a concrete jungle.
However, in the spirit of female contrariness, I have decided now is the time to add more green into my life. So I will bring the outside in. I will do it in style and, more importantly, in a way that is easy to maintain and can’t be too easily mutilated by the small, destructive paws of a toddler. I will make a Terrarium.
For those not familiar with the concept (or too young) they are essentially a ‘garden-in-a-jar’ (although any suitable see-thru vessel will do). All the rage in the 70’s, these kitsch, miniature biospheres fell out of favour. Presumably when people realised that not only did they did have a tendency to look a bit naff, but that the containment factor was actually a bit of a hindrance; too much water and your succulents resemble a primordial mush, too little and you quickly acquire a post-apocalyptic desert-scape. Both equally tricky looks to pair with a macrame table cloth.
Old-school Terrariums:


Nu-school Terrariums:


Seems they’re slowly making a bit of an ironic (of course) comeback on both sides of the Atlantic. Recently The Telegraph and NY Times ran pieces devoted to their revival and i’ve noticed them popping up on design blogs over the last few years ( Design*Sponge featured a brilliant ‘how-to’ video from Tassy of Sprout in Brooklyn, NYC, you can view here).
Today’s Terrarium lovers, it seems, aren’t afraid to inject a little humour and originality into their creations (miniature fornicating gnomes anyone?) but my favourites are the chic, modern arrangements, particularly the hanging variety. I also love the trend for repurposing antique and vintage glassware such as apothecary jars and cloches, which I think work best when you are aiming for a more,ahem, ‘romantic’ look.
I was torn. Much was dependent upon the kinds of plants I could get my hands on. After a surprisingly successful trip to my local supermarket for miniature plants, and one to Ikea for some pebbles, sand and suitable receptacles, I decided I would try both looks. But first I needed guidance, and I implore you now, do not even attempt to try this at home without first checking out the rather marvelous blog of Tovah Martin.
I quickly realised, however, that my plants were probably still a tad too big, and I couldn’t get one of the essential components: charcoal (helps to absorb yukky bacterial spores and any gunk that might fester and ruin your plantings). But impatient as I am, I decided to roll with what I had and let fate decide. Here is my ‘wing it big-time guide’ to planting a Terrarium:
Step one: add drainage course (ie pebbles- about one inch, or half that if you are me and run out of pebbles).
Step two: add charcoal (or greenish dyed sand from Ikea if you are me- note the sand has completely covered the pebbles. Hmmph).
Step three: add soil (I kind of got this bit right but you need a special cactus/succulent mix and I think a couple of mine fall under this category, so the multi-purpose soil mightn’t go down quite so well with them). The pebbles and soil should fill your container by about a third (or halfway if you are applying my rules).
Step four: add your plants (try not to lacerate and shed all the really nice leaves when placing into the container, like I did). If leaves etc do shed on to the soil, remove – the last thing you need is for your hard work to become a study in decomposition. (Oh and try not to lacerate the last very few remaining good leaves when rescuing the other previously dislodged/lacerated leaves).

Step five: admire your stumps handiwork. I give this one about a 6 out of 10, but it works in the space, and looks a tad more retro than I expected, so I’m happy. (ah yes, and Instragram helps a lot).

Now I would be lying if I said I didn’t think this was more of a success. In fact I would say it’s a TOTAL garden-party-in-a-vase 🙂

The great thing about this little project was how relatively easy it was to achieve fairly satisfying results. If, like me, you have little patience, then a Terrarium presents a pleasingly quick-hit opportunity to impress with “and here’s one I made earlier”. All that remains to be seen is how long I can keep their contents alive. Place your bets ladies and gentlemen….
Absolutely Nothing To Make – Peony Pom Poms by Samantha Taylor
Posted: July 28, 2011 Filed under: Absolutely Nothing To Make Leave a commentI came late to the pom pom party. In fact had I not been drooling regularly over kids’ room tours on ohdeedoh and various style blogs, they may yet have passed me by. But slowly I noticed these ethereal tissue paper bundles floating in some very chic nurseries and once I’d ascertained exactly what they were, and how to get them, I was on a mission. It seems that i’ve missed a trick because they have, in fact, become something of a phenomenon in crafty circles since their ‘invention’ by Martha Stewart some time around 2006. Whether or not this is entirely true, Her Royal Homeliness does have a knack for taking a craft trend and giving it a contemporary spin and if the images on the MS website don’t tempt you then you will probably never be a convert (you can buy them via the MSL Amazon store here)
They’re surprisingly easy to make too. You can follow her little tutorial here:
You need a pack of tissue paper (12 sheets should give you nice full poms), some florist’s wire and monofilament or ribbon to hang.
1. Stack your tissue. Fold the tissue, accordion style, in 1 1/2″ wide folds, creasing the folds.
2. Fold a length of florist’s wire in half. Slip over middle of folded tissue, twist. Trim the ends of the tissue (rounded or pointed depending on preference).
3. Turn on side and pull a layer at a time up and out, pulling away from centre.
4. Tie monofilament to wire for hanging
Of course, I realise any DIY bride, party and wedding planner worth their salt can whip up a roomful of these frothy little beauties blindfolded, but I wanted a more permanent reason to use them. So, as I’m a sucker for anything that will give the decor in my blah rented apartment in Hong Kong a bit of oomph without a) spending too much and b) infuriating the landlord, I determined that I needed to work them in to my own home. Hubby quickly vetoed any area he uses regularly (‘but surely they would look more masculine in monochrome shades?!’) So that left the kids’ rooms and the perfect opportunity to indulge my pom pom fixation, because they are both still at the age where MUMMY DEAREST KNOWS BEST mwah ha ha. So the baby (boy) got the pom poms and all my husband could say to the contrary was “you DO know he’s a boy, right?”. Pah.
Here they are in situ:

I realise my primping leaves a lot to be desired but this would be a pretty dull corner of the room without the poms don’t you think? Not too girly?
More pom pom loveliness (not mine by the way):
There are plenty of online stores devoted to poms (try Etsy) and many have a wide selection of sizes and colours and you generally choose between rounded or pointed petal ends. The more layers of tissue, the fuller your finished poms. They come folded and ‘unbloomed’ with wire, or ribbon, for hanging. It will probably take you a tad longer than you expect to get the knack (my tip: don’t pull too gently, be confident – fast and random is better) but I can assure you; a fully bloomed and primped pom pom is a very, VERY satisfying thing to behold. Just beware of primp fever. Once you start, it’s really very difficult to stop.
I purchased my Pom Poms from I Have Ribbon (U.S) Visit their Etsy store here (they ship internationally).
Check out this great little ‘pom blooming’ tutorial on You Tube from Paperwhite Pom-Poms.

