
Spring in the snow : Broad Bean Risotto
Posted: March 23, 2013 Filed under: Absolutely Nothing To Cook, Absolutely Nothing To Eat, Absolutely Nothing To Wear 1 CommentAs my out of season addiction with the Broad Bean continues, I thought I’d try something a little more warming….seeing as Spring seems to be dressed up in Winter clothing for now.
I love risotto. I learned how to make it when I lived in Venice almost 20 years ago. It was actually my American flatmate who taught me and I’ve been in love with the wonderful Arborio grain ever since. You can make risotto with pretty much anything, that’s the beauty of it. Whenever we’re low on things in the fridge but want something delicious and comforting, risotto is the dish to turn to.
When you know the basic formula you don’t really need to use a recipe, but there are always little tips and secrets to pick up if you take the time to look around. This recipe for Broad Bean Risotto with Mint is nothing out of the ordinary but there is something in here which I certainly wouldn’t have thought of had I made it without a bit of research. Taken from The Eagle Cookbook and found on The Guardian website, this is a delicious, easy and very pretty risotto which was a pleasure to both make and eat. I used mint but also some parsley to garnish – it worked.
Risotto with broad beans and mint
You could use fresh, but not frozen, peas instead of broad beans and you could also substitute basil, marjoram or oregano for mint.
Serves 5–6 as a starter
About 3kg/ 6½lb fresh broad beans (400g/14oz podded and shucked weight – see above)
2 tablespoons extra virgin olive oil (optional)
About 2 litres / 3½ pints vegetable or chicken stock
150g/5oz unsalted butter
2 onions, finely chopped
2 garlic cloves, finely chopped
300g/11oz arborio rice
A glass of white wine
A bunch of mint, chopped
About 75g/3oz Parmesan cheese, freshly grated
Salt and freshly ground black pepper
The first thing I do for this recipe involves a food processor and is entirely optional. I put roughly half the broad beans in a food processor with the olive oil and pulse them roughly for about 20 seconds to make a loose paste. If the paste is too stiff, add a drop of water and pulse again very quickly. This adds a creamy base to the risotto and makes the colour a little more intense.

Broad Beans ready to be pasted
Put the stock in a pan and bring it to simmering point. Gently heat 100g/4oz of the butter in a separate pan, add the onions and garlic with a little salt and fry gently until tender. Do not let them brown. Turn the heat up high and pour in the rice. Stir it with a wooden spoon for about half a minute, coating it with the butter; do not let it stick to the pan. Add the wine and let it bubble fiercely for about a minute, stirring gently all the time. Quickly stir in the broad bean paste, if using, then reduce the heat and start to add the hot stock in stages as described on pages 92–93. When the rice is done, remove from the heat, add the rest of the butter and cover the pan until it has melted. Stir it in with the broad beans and mint, then add the Parmesan and some seasoning. Serve immediately


Another Ottolenghi treat : a really really easy one
Posted: February 27, 2013 Filed under: Absolutely Nothing To Cook Leave a commentIt’s cold. Really really cold. And because it’s cold we need warming, nutritious, comforting food. We need it to be quick and easy and relatively painless. This is all of those and the only downside was that I didn’t make more of it – I halved the recipe to feed 3 of us and I should never do that.
I’m a bit of an Ottolenghi fan but even I can find all the spices a little too much to handle at times. This recipe uses the softest of spices which makes it a treat without being overly fussy. It’s also incredibly easy to make and I shall be probably be cooking it very often indeed. I actually think this one could turn even the most hardened of Ottolenghi cynics.
I forgot to take a picture in all the excitement so here it is photographed straight from the pages of Jerusalem
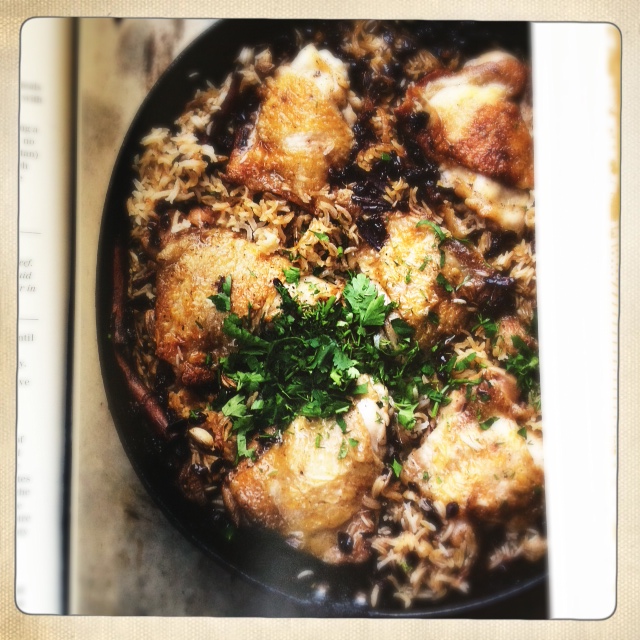
Chicken with Caramelised Onion & Cardamom Rice
- 40g Sugar
- 25g Barberries (or Currants, Sour Cherries & Cranberries)
- 4 tbsp Olive Oil
- 2 Medium Onions
- 1kg Chicken Thighs
- 10 Cardamom Pods
- 1/2 tsp Whole Cloves
- 2 Long Cinnamon Sticks, broken in two
- 300g Basmati Rice
- 550ml Boiling Water
- 5g each Chopped Parsley, Dill & Coriander
- 100g Greek Yoghurt mixed with 2 tbsp Olive Oil
- Sea Salt & Black Pepper
Method
- Put the sugar in a small saucepan with 40ml of water and heat until the sugar dissolves. Remove from the heat, add the barberries and set aside to soak. If using currants you do not need to soak them in this way. (I used this method with my dried cranberries and it worked well)
- Meanwhile, heat half the olive oil in a large sauté pan for which you have a lid, add the onion and cook over a medium heat for 10-15mins, stirring occasionally, until the onion has turned a deep golden brown. Transfer the onion to a bowl and wipe the pan clean.
- Place the chicken in a large mixing bowl and season with 1 & 1/2 teaspoons of salt and black pepper. Add the remaining olive oil, cardamom, cloves and cinnamon and use your hands to mix everything together well. Heat your frying pan again and place the chicken and spices inside. Sear for 5mins on each side and remove from the pan (this is important as it part-cooks the chicken). The spices can stay in the pan but don’t worry if they stick to the chicken. Remove most of the remaining oil as well, leaving just a millimetre at the bottom. Add the rice, caramelised onion, 1 teaspoon of salt and plenty of black pepper. Strain the barberries and add them as well. Stir well and return the seared chicken and push into the rice.
- Pour the boiling water over the rice and chicken, cover the pan and cook on a very low heat for 30 minutes. Take the pan off the heat, remove the lid and quickly place a clean tea towel over the pan and seal again with the lid. Leave the dish undisturbed for another 10 mins.
- Finally, add the herbs and use a fork to stir them in and fluff up the rice. Taste and add more salt and pepper if needed. Serve hot or warm with yoghurt if you like.
Cauliflower Pakoras – Ottolenghi
Posted: September 13, 2012 Filed under: Absolutely Nothing To Cook, Absolutely Nothing To Eat 1 CommentAfter a recommendation from an ANTW reader, I made these last night and they were wonderful. Should have perhaps made half the amount of mixture but it means we can enjoy them for a second night. Plus they have no dairy which is good for all kinds of people and the vegetables stay really crunchy and delicious. I didn’t use nearly as much oil as it says in the recipe, it doesn’t need it, and I used Rape Seed Oil rather than Sunflower. Great with plain yoghurt and mango chutney.

Cauliflower pakoras
Although fried, these snacky treats are light in texture. Makes about 25.
150g chickpea flour
100g plain flour
1½ tsp baking powder
1 tsp cayenne pepper
½ tsp ground turmeric
2 tsp ground cumin
100g green beans, cut into 1cm pieces
1 medium cauliflower head, roughly chopped (400g net weight)
2 green chillies, finely chopped
2 cloves garlic, peeled and crushed
30g ginger, peeled and chopped fine
30g coriander leaves and stems, chopped
30g spring onion, trimmed and sliced thin
1 tsp coriander seeds, toasted and lightly crushed
10 fresh curry leaves (or 20 dried ones), finely chopped
300-400ml sunflower oil, for frying
200g Greek yoghurt
Salt
In a large bowl, mix the first six ingredients. Make a well in the centre and slowly pour in 350ml cold water, stirring just to combine; the batter can be a bit lumpy. Add all the other ingredients bar the oil and yoghurt, plus a teaspoon and a half of salt. Stir gently to combine and set aside.
Pour oil into a large frying pan to come 1.5cm up the sides and put on medium-high heat. Once hot, scoop in a large spoonful of batter and fry for 90 seconds to two minutes on each side, until golden brown. Remove with a slotted spoon, drain on kitchen paper and keep warm while you cook the rest in batches. Serve warm with yoghurt.
Not just another Ottolenghi blog…
Posted: September 9, 2012 Filed under: Absolutely Nothing To Buy, Absolutely Nothing To Cook, Absolutely Nothing To Eat, Absolutely Nothing To Read, Absolutely Nothing To Smile About 2 CommentsEver since the wonderful Wilderness Festival, we’ve become a little bit addicted to the various culinary delights from Ottolenghi and Moro. I always like to think of myself as being a little bit behind the trends, someone once told me I would never be a visionary and so I’ve taken this on board and now store any ideas and discoveries and release them to the world when they think it’s all over…..well that’s what I like to tell myself anyway. So, with that in mind, I am very aware that these two restaurants / cookbooks / deliciousness won’t necessarily be new to many, but if like me you haven’t yet attempted them at home, may I suggest that you do….immediately.

Favourite books of the moment
We started with The Moro Cookbook and both Ottolenghi’s, Plenty and The Cookbook and most recently we’ve moved on to the wonderful new Jerusalem from Yotam Ottolenghi and Sami Tamimi. We’ve re-stocked our spice cupboard with things such as Zatar and Sumac and made sure there’s enough Cumin, Turmeric, Corriander and Cardamon to see us through every recipe we may attempt. To begin the feast I chose something relatively easy : Chilled Red Pepper Soup and Cauliflower Fritters, both from Ottolenghi followed by Aubergine and Tomato Pilav from Moro. Not all in one sitting, that would be ridiculous….although very very tempting.

Cauliflower and Cumin Fritters – Ottolenghi

Roasted Red Pepper Soup – Ottolenghi
And then last night came the best of the best, both from Jerusalem : Pureed Beetroot with Yoghurt and Za’atar and Butternut Squash and Red Onion roasted with Tahini and Za’atar. It was ridiculously good and so easy and really annoying that we had no one over for dinner to show off to share with.

Pureed Beetroot with Yoghurt and Za’atar – Ottolenghi Jerusalem
Pureed Beetroot with Yoghurt and Za’atar – Ottolenghi, Jerusalem
6 medium beets trimmed
2 small garlic cloves, crushed
1 small red chilli, seeded and minced
250g plain Greek yogurt
3 tablespoons extra-virgin olive oil
1 1/2 tablespoons Date syrup (or pure maple syrup works too)
1 tablespoon Za’atar
Salt
Handful roasted, crushed hazelnuts
2 tablespoons goat cheese, crumbled
2 spring onions, thinly sliced
Preheat the oven to 350°. Wash and trim the beetroot and wrap each one individually in silver foil. Place in a baking tray and cook for about an hour – until you can pierce them with a sharp knife.
Once cool peel the beetroot, cut into wedges and transfer to a food processor. Add the garlic, chilli and yoghurt and pulse until blended. Add the olive oil, date or maple syrup and za’atar and puree. Season with salt. Scrape into a wide, shallow bowl. Scatter the hazelnuts, goat cheese and spring onion on top and serve.

Butternut Squash and Red Onion, roasted, with Tahini and Za’atar
Butternut Squash and Red Onion, roasted, with Tahini and Za’atar – Ottolenghi, Jerusalem
1 large butternut squash (around 1.1kg), cut into 2cm x 6cm wedges
2 red onions, cut into 3cm wedges
50ml olive oil
Maldon sea salt and black pepper
3½ tbsp tahini paste
1½ tbsp lemon juice
3 tbsp water
1 small garlic clove, crushed
30g pine nuts
1 tbsp za’atar
1 tbsp roughly chopped parsley
Heat the oven to to 220C/425F/gas mark 7. Put the squash and onions in a large bowl, add three tablespoons of oil, a teaspoon of salt and some black pepper, and toss well. Spread, skin down, on a baking sheet and roast for 40 minutes until the vegetables have taken on some colour and are cooked through. Keep an eye on the onions: they may cook faster than the squash, so may need to be removed earlier. Remove from the oven and leave to cool.
Put the tahini in a small bowl with the lemon juice, water, garlic and a quarter-teaspoon of salt. Whisk to the consistency of honey, adding more water or tahini as necessary.
Pour the remaining oil into a small frying pan on a medium-low heat. Add the pine nuts and half a teaspoon of salt, cook for two minutes, stirring, until the nuts are golden brown, then tip the nuts and oil into a small bowl.
To serve, spread the vegetables on a platter and drizzle over the sauce. Scatter the pine nuts and oil on top, followed by the za’atar and parsley.
Absolutely Nothing To Cook : The Key To Key Lime Pie, by Micki Myers
Posted: August 31, 2012 Filed under: Absolutely Nothing To Cook, Absolutely Nothing To Eat Leave a commentOne of the most glorious food items that gets utterly ruined when people try to mass market it is Key Lime Pie. One of the biggest food faux pas is when people mistake or knowingly substitute your regular green limes for key limes, which are not the same thing at all. The key lime is a tiny thing, the size of a cherry, and looks like a yellowish-mottled kumquat. Its flavor is far less tart than its Hulkier cousin, too — instead it is sweet yet piquant, with none of the bitterness of a lemon. The pie made from it is designed especially to showcase this lovely citrus flavor, and is well worth making.

First, you’ll need to zest and squeeze 20 or so key limes. Use a plane zester and an old-fashioned glass squeezer upon which you can palm each half lime. I find myself giving it a quick press and then pinching the spent skin over the glass knob to finish it off. I also take my time, alternating with other chores; try to do them all at once and you’ll bugger up your wrist something chronic.
Make a graham cracker or biscuit crumb base. If you’re American this means zapping graham crackers in a food processor (or just buying it already crumbed); if you’re British it means doing the same with Digestive Biscuits. Mix with the melted butter and sugar, press into a tin, and bake for 5 minutes or so until it’s firmed up a bit.
Mix the zest in a bowl with the egg yolks and lime juice, then add the condensed milk. A tin of condensed milk out to be a pantry staple for emergencies. Be sure to use a spoon to scrape every last succulent, sugary drop of it from the tin rather than simply diving after it with your tongue.
You’ll have a luscious, pale custard. Pour this into the biscuit base, set the whole thing onto a baking sheet, and pop in the oven for 15 minutes until the heat has had a chance to work its magic on the eggs. It will still seem a bit too wobbly when you take it out, but that’s OK — the next step firms it up. Once it has cooled to room temperature, put some cling film over it and pop in the fridge for a couple of hours.
The finished pie will be diminutive in height, and a luxurious creamy color flecked with bits of pale green zest. Cut small slices; this baby’s rich.
If there’s any left, refrigerate until midnight, then sneak out of bed and polish it off.

RECIPE:
Crust: 14 graham crackers or digestives, 1/3 cup sugar, 1/3 cup melted butter
Custard: ½ cup lime juice, two egg yolks, 1 14oz can condensed milk
Regular cake tin; moderate oven, cold fridge.
Just peachy
Posted: August 2, 2012 Filed under: Absolutely Nothing To Cook, Absolutely Nothing To Eat, Absolutely Nothing To Make, Absolutely Nothing To Smile About, Absolutely Nothing To Write Home About 1 CommentI’ve been a little lazy with posts recently but if I don’t write this down now, I’m worried I might forget it.
We’re in the South of France at the moment, having a wonderful time with family and friends and eating delicious things. These holidays always very much revolve around food. Conversation at breakfast is generally about what’s on the menu for lunch and dinner and everyone is keen to offer their own contribution to the table. Last night was my turn and so baked peaches with Roquefort and Parma ham for 12 was on the menu. With my trusty sous chef looking over my shoulder by my side, we managed quite a spectacular plate of food and one I’ll definitely be making again….but perhaps in smaller quantities.
So here’s what we used and how we did it :
Peaches – we used a mixture of big round ones and the little flat ones all stoned and quartered. Allow about 4 pieces per person.
Roquefort
Parma Ham
Mixed leaves
Honey roasted walnuts
Thyme roasted almonds – or you just as easily use plain
Thyme
Salt
Pepper
Sugar
Olive Oil
First we baked the peaches on a low heat for about 30 minutes. Just all huddled in a tray and sprinkled with sugar, salt, pepper, olive oil and some fresh thyme.

Once done, leave them to cool a little – the salad is best served at room temperature.
The nuts – we bought a bag of walnuts and thyme scented almond. The walnuts we drizzled with honey and put in the oven for 15 minutes or so until the became sweet and crunchy. Once cooled, smash them all up in to little pieces with a rolling pin – the almonds too. Set aside to use later.

We cut the parma ham in to small strips and crumbled the roquefort….more about this later
Dress the leaves with a little bit of olive oil and vinegar. It doesn’t need a strong dressing as all the flavours are to come.
Place a small pile of leaves on the plate. Set the peaches on top and lay the strips of parma ham across them. Not too much. Sprinkle the crumbled roquefort – again, you don’t need too much – and drizzle some of the juices from the peaches pan over the salad. Lastly throw some of the crushed nuts around the plate and that’s it!


Absolutely Nothing To Eat : Linguine with Tomato and Capers
Posted: June 14, 2012 Filed under: Absolutely Nothing To Cook, Absolutely Nothing To Eat Leave a commentIt may not sound like the stuff of culinary revolutions but this is just about one of the best spaghetti dishes I’ve ever made. It was the happy result one of those can’t be bothered, far too tired sorts of dinners. After being monumentally let down by Rico’s Pizza Shack (the most delicious wood fired pizzas served from a travelling food truck…which didn’t show up) I had to resort to something quick and tasty from a very empty fridge.
What I did have was a tin of tomatoes, a jar of capers, 2 lonely looking cloves of garlic, some fresh herbs, a packet of Linguine and ta-daah…it was delicious.


Put a spash of olive oil and some butter in a large frying pan, throw in the crushed garlic and a handful of chopped rosemary and thyme. Cook it for a minute but don’t let the garlic go brown. Add the tin of chopped tomatoes and a couple of teaspoons of capers (the small ones) or as many as you fancy. Stir it all together and cook on a medium-ish heat. I added a tiny bit of salt and some ground black pepper. I also stirred in a teaspoon of sugar but you can use balsamic vinegar or something similar if you prefer…and you have it in the house. Cook for 10 minutes or so until the liquid from the tomatoes has evaporated a bit and the whole thing looks dark and rich. It really doesn’t take long. Cook your Linguine (or Spaghetti…it doesn’t matter a bit) as normal and drain. Just before combining it all together, stir a couple of teaspoons of creme fraiche to the tomato sauce and some torn basil leaves. Add the spaghetti to the frying pan and mix it all together so every single strand is covered. Serve straight away with some more fresh basil leaves to make it look pretty.

Sorry my spaghetti photo is a little blurry – I was hungry.
Absolutely Nothing To Cook : Anniversary Red Onion Tarte Tatin
Posted: March 25, 2012 Filed under: Absolutely Nothing To Cook, Absolutely Nothing To Eat Leave a commentLast night I made something sweet for our 6th “sugar” wedding anniversary. This was the first thing I ever cooked for my now husband, Jay Jay. He rather romantically remembers it as the evening he fell in love with me…..the cynic would perhaps add that he was single, hungry and living with his Mum.
It’s a pretty easy recipe and very delicious but it does take a bit of time. When cooking it yesterday, I was reminded of a time when I too was single, without children and had literally HOURS to spend reading recipe books and cooking lovely things. This time around it was all a bit of a rush and we ate rather late.
So here it is, the basic recipe is from a book called Notting Hill Cookbook by Carina Cooper which is far from being one of the greatest cook books ever written but this tart makes it almost worth while. Really it’s just an apple tarte tatin but made with onions instead of fruit. There are variations on this recipe all over the internet so you may well find an easier one – I stuck with my original for reasons of sentiment, but also added thinly sliced goats cheese and a little bit of rocket to make it look pretty.

The main part of this recipe is taken straight from the pages of Carina’s cookbook – the words in itallic are my own additions and interpretations.
Ingredients :
About 900g baby or small red onions, peeled
25g unsalted butter
1 tbsp olive oil
2 1/2 tbsps sugar – I only used 2 teaspoons as I was making a smallish one….which was more than enough sugar
Salt
A few sprigs of fresh rosemary, chopped finely
black pepper
Pack of ready made All Butter Puff Pastry (use as much as you need)
What you do :
You need a heavy cast iron frying pan for this or just one which can go in the oven.
Preheat oven to 220 C / gas mark 7. Melt the butter in a frying pan on the hob and add the olive oil. Add the onions making sure they fit cosily in one layer – I cut them in half and put the flat side down to begin with. Sprinkle with the sugar, salt and rosemary. Turn the onions until they are slightly caramelised and then add water up to the top of the onions.
I end with the onions on their rounded side down before I add the water.
Bring the onions to simmering point and then let them cook until all the liquid has evaporated (about 10-15 mins) leaving a lovely sticky glaze.
Roll out your pastry thinly to fit the top of the pan and then lay it over the onions and tuck it down snuggly round the edge of the pan. Bake in the oven until the pastry is golden brown (about 15-20mins).
Now, Carina takes the pastry off and then scoops the onions out and lays them on. I put a plate over the pan and tipped the whole lot over and it came out beautifully. That way you keep the shape of the onions and it looks like a proper Tarte Tatin.
Once your Tarte is nicely turned out on a plate, finely slice some goats cheese and sprinkle on the onions. Add a bit of pepper and a few sprigs of rosemary if you like. Rocket leaves look rather nice too.
I served it with a green salad with balsamic, olive oil and mustard dressing.
It worked beautifully…I reckon we might make 7 years thanks to this Tarte.
Absolutely Nothing To Wolf Down : Jelly Roll by Micki Myers
Posted: January 17, 2012 Filed under: Absolutely Nothing To Cook, Absolutely Nothing To Eat, Absolutely Nothing To Smile About Leave a commentOn a dark, blustery winter’s day when you burst into the warm house after school, grabbing off your satchel and kicking off your boots in the hallway with a trickle of wet snot running to your lip, all you want is to feel like you’ve come home — and the best way to do that is with a belly full of cake.
A traditional jelly roll is just such a cake. A long spiral of Génoise sponge, red jam and whipped cream, it practically oozes love, each slice a big, wet kiss.
The only real secret to success is in the fat-free batter, which gives the sponge just the right flexibility to stay curled up without cracking. It tastes like sweet, moist air. I made this one with half a jar of leftover cherry jam I’d made the day before, so it also gave one the sensation of being able to eat Kirsch, though any jam will do.

Jelly Roll
Classic Roulade
Pre-heat oven to 350. Line a 10 X 15 inch baking tin with parchment paper.
Separate 4 eggs.
Whip the whites with 6 tablespoons of sugar until they refuse to slide when the bowl is tipped.
Whip the yolks with 4 tablespoons of sugar and a teaspoon of vanilla until it folds in on itself in big fat pale ripples.
Sieve together ½ cup of cake flour with ¼ cup of cornstarch and a pinch of salt.
Carefully fold some whites into the yolks, then some flour, then some whites, then some flour, etc., until you have incorporated them all together in a silky, voluminous batter.
Gently spread the batter out on the baking pan and bake on a low shelf for just 10 minutes. The cake should be just starting to turn golden, and feel springy to the touch.
As soon as you take it out of the oven, turn the cake out onto a tea towel dredged with sugar. Peel the parchment off. Slice off one of the short ends, and use the tea towel to roll it up. Leave to cool rolled up.
Once cooled, unroll, spread with jam and cream, and roll back up.
Et voila.

Ready for tasting....
Pass the Panettone : Re-gifting and Recycling Christmas
Posted: January 16, 2012 Filed under: Absolutely Nothing, Absolutely Nothing To Cook 1 CommentEvery Christmas we are given a Panettone by our neighbours. It usually arrives around the 4th January. It sits on the kitchen shelf looking lonely and a little unloved, knowing that it has gone from fabulous Italian bowed gift to being just another unwanted Panettone. We always put it to good use – bread and butter pudding is amazing when made with this fruity loaf and it’s also delicious toasted with a bit of butter for breakfast – but it has become the sign that Christmas is over and that the regifting has begun.
There’s nothing wrong with re-gifting. In fact, it’s much better to recycle any unwanted or replicated gifts than to hide them away and let them gather dust. And I know that Id be much happier thinking that gifts I’d bought had eventually ended up in a good home even if it wasn’t with the intended recipient. But not everything is ripe for a re-gift so you have to be careful and only pass on those things which are either edible or easy to remember / replace if needed.
Books, like Panettone, are always good to recycle and pass on. If you receive a book you’ve already read and enjoyed, it would be madness not to share the delight. My husband was given the same book by 3 different people this year, a book he was also given on his birthday last year. Luckily he’d given away his original copy already so he’s now managed to replace that for himself and stock up on presents for like minded friends. Chocolates are a good gift to pass on too….if you have simply too many, rest assured there’s someone out there who will happily take them off your hands. Or you can freeze them, something we did last year, we had lots of little bags of ice hard chocolates which we’d melt down for various recipes or occassions.
There’s simply no point having more than one of the same thing. No one wants that. Neither does anyone want to ask for the receipt in order to make an exchange. Regifting and recycling is the only way forward. It’s the right thing to do. So pass the Panettone and get on with the New Year.

A happy Panettone
Recipe for Panettone Pudding from Good Food Magazine :
- 50g butter , softened (optional)
- 250g panettone (about 5 medium slices)
- 2 eggs
- 142ml carton double cream
- 225ml milk
- 1 tsp vanilla extract
- 2 tbsp caster sugar
- icing sugar , for sprinkling
- Preheat the oven to 160C/gas 3/fan 140C and grease a 850ml/1½ pint shallow baking dish with a little butter. Cut the panettone into wedges, leaving the crusts on. Butter the slices lightly with the rest of the butter. Cut the slices in half and arrange them in the dish, buttered side up.
- In a bowl, whisk together the eggs, cream, milk, vanilla extract and sugar and pour evenly over the panettone.
- Put the dish in a roasting tin and pour hot water around it to a depth of about 2.5cm/1in. Bake for 35 minutes until the pudding is just set – it should be yellow inside and nicely browned on top. Dust with icing sugar and serve.

